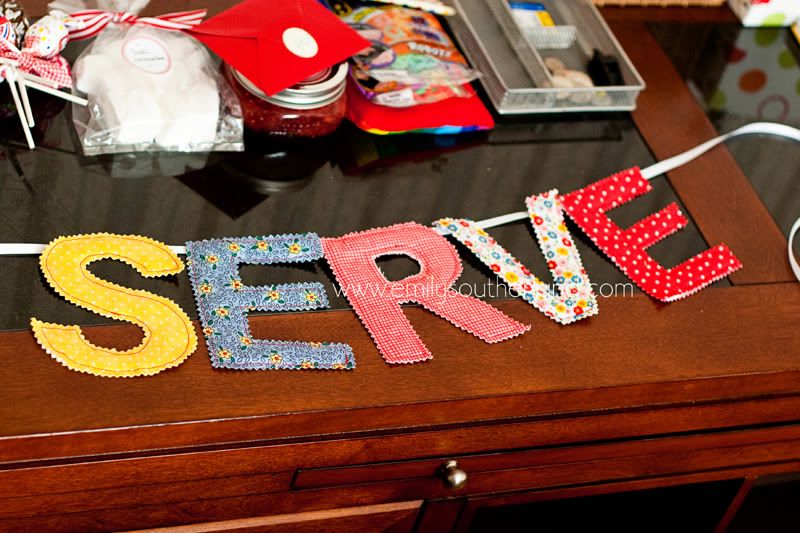
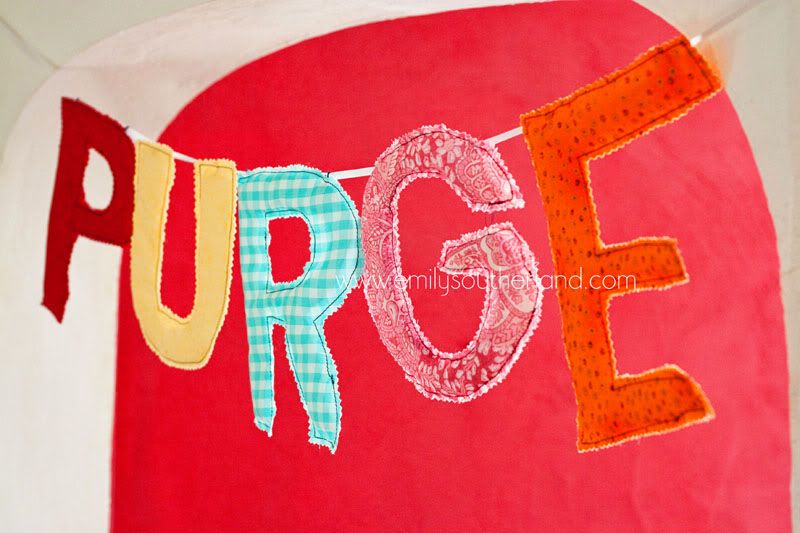
If any of you have ever followed Ali Edwards, scrapbooker/designer/web goddess, you know she has a ritual of choosing a word of the year to live by every New Year's Day. It's kinda cool--- a word like "breathe" or "cherish".... something that becomes a mantra and shapes your actions for your 12 months ahead.
I, myself, haven't actually committed to this practice... haha! Funny I'm blogging about it without being one to DO it... But the point is, a LOT of my friends DO try to choose word a year, and really DO focus on it. So when I came across the following sewing project--- originally a "MERRY CHRISTMAS" fabric banner from a fabric store pamphlet-- I KNEW it was a perfect fit to gift some friends with banners that spelled out their word of the year... Words like:
Cute, right??
I just didn't have the mojo to try a whole "MERRY CHRISTMAS" banner for my home, plus if you remember form the last crafty post, I've been trying to use only scrap fabric I already had, and I didn't have enough Christmas-toned fabrics for a banner like that. But making these shorter words for my friends was a fun way to TRY the project, but not have to commit to too much, time AND fabric-wise.
So, one good friend has her family focusing on the word "SERVE". I love that!
But the other one of these I made is a little less..... deep.
See, my OTHER friend is preggy like me, and has had a ROUGH go of it all nine months. Her first trimester morning sickness turned into EVERY TRIMESTER MORNING SICKNESS. Add to that, she and her hubs have been trying to clean out the corners of their home to get it sellable... and because of those two seemingly unrelated facts about her, it became a joke among friends that her word of the year should be:
And when I thought about this big, not-so-pretty word in FABRIC, I couldn't stop giggling. So I made it for her. As a joke. As a pick-me-up in her miserable day. And It makes me smile.
And luckily, she gets my sense of humor, because she actually hung the thing up in her house. Ha! (Thanks, Mel!)
Anyhoo.... Just another random crafty I played with this winter, post-holidays, when trying to only use scrap fabric.
*
I don't have an ACTUAL TUTORIAL for these, but I can give you the basic steps. They're cute, and the possibilities are endless if you have patience to cute and sew letters!
HOW TO SEW FABRIC WORD BANNERS
Materials:
scrap fabric (pieces at least 7"x7" are helpful)
thin batting (but you could use light-colored fleece or felt if you wanted)
coordinating or contrasting thread (depends on your style)
Word Processing program on your computer, and a printer
pinking shears
ribbon or twine for hanging
Step One:
Go to Microsoft Word or whatever, and type out your word. If you want a clean, straightforward font like mine above, I used ARIAL BLACK for big, chunky thick letters. Change the font size to something between 450-750 pt. font. At this size, your word will print about one letter per sheet of paper.
Step Two:
Cut out your printed letters and pin them to your fabric. You can use all one fabric, or a mish-mash like I did. You can use the same fabric for front and back, or just go crazy and make every piece of fabric totally different.
Step Three:
I like to cut my letters in a stack, all at once, instead of cutting out just the front, then just the back, then just the batting. TOO MUCH WORK! I sandwich the whole thing from the get-go, so that the fabrics are facing out and the batting is in the middle, and pin and cut like that.
Step Three A:
I used pinking shears to cut out my stack. If you want to have a little more control, you can cut out your letters with regular scissors first, but with a 1/8-1/4" seam added to the edge. Then after your letter is cut out, you can go back and pink that 1/8-1/4" edge off with your pinking shears.
Step Four:
Once your sandwich is cut, you'll unpin it and take away the pattern paper and take out the batting piece. At this point, you want to trim your batting to be skinnier than the fabric letters. I cut about 1/4" off of all sides of the letter so that you get a skinny version you can then put back between the fabric letters. Now your batting/felt/fleece won't be hanging out the edges if you get sloppy in your sewing!
Step Five:
With your fabric sandwich pinned, you then sew a straight running stitch (I prefer machine sewing, but you could hand-stitch this, too) around the border of your letter, around 1/4" in from the pinked edge.
Because the edges are pinked, they won't fray, so you are not doing any inside-out sewing. What you see is what you get, so when you're done sewing, your letter is basically DONE.
Step Six:
I used embroidery floss on the backs of the letters to create little loops to run my ribbon through. I just stitched a loop in the places where the letter needed to hang from and be supported, and then ran ribbon through them all and VOILA!
There are probably other better ways to get your letters in a banner form--- you could sew them directly to ribbon, glue them, pin them, whatever...
And if you go back and look at the detail shot of my letter "G", you'll see that the poor letter was NOT hanging well without a little help: I had to stitch a support line to keep the lower half of the G from flopping backwards and messing up the whole thing. A way to prevent weak, wimpy letters from flopping is to either:
A. Cut smaller letters (closer to the 450 pt. font size instead of the 750 pt font size)
B. Iron on some light interfacing to your fabric first
C. Use felt or upholstery type fabric for a sturdier fabric
Anyhoo.... It's not a tutorial, per se.... But it's a start. Go make your own word banners! A kids' name for their room! Your surname for your entryway. Or your word of the year. Heck, go make one that says "MERRY CHRISTMAS", if you have more stamina than I! (Then mail it to me, haha!)


Love the PURGE banner. Need a HANGRY one. :)
ReplyDeleteNo, thank YOU, Em. It still hangs happily over our kitchen bar. :) It's just so cheerful! And it's fun to confuse the random strangers that stop by.
ReplyDeleteI'll have to take a decent picture and blog it so you can show it off.
And I agree, Anna needs a HANGRY one.
Happy day! More posts! I am going to be both thrilled and sad when Lucy arrives, as she'll finally be here (yay for Lucys!) but sad because I know how incrediblly difficult it is to find time to do ANYTHING with a newborn, and I won't get to enjoy your fabulous posts.
ReplyDeleteI still need to get you to do a personal tutorial for me to teach me how to use my sewing machine (blush).
Hope all is well!
Awesome!! Making something fun like this for our Christmas photo (assuming this project isn't way too complex for me). Thanks for the GREAT idea!!!
ReplyDelete