
Phew! This week has been INSANE. Yeah, and that makes ME insane for trying this Tutorial Week thing at the same time as moving. It's just, I thought since I had the stuff MADE, and most of the photos taken, it'd be no problem! I just didn't take into account the PHYSICAL EXHAUSTION I'd be feeling from all the moving stuff, and the emotional weariness from all of it. And I am DOG tired. So... yeah, it's nearly midnight, and this blog will BARELY squeeze in on the day it is supposed to be on. Yikes!
Still... It has been INCREDIBLY fun to do this. And quite honestly, if there was any week I could use the influx of comments and blog love I've gotten with this contest, THIS would be the week. Being so spread thin... being so weary... it has been incredibly uplifting and re-energizing to hear from all of you. To even hear from longtime lurkers. I love lurkers! I'm a lurker myself on several blogs. :P
So... Anyway. Thanks for putting up with me.... being a bit late with this post. I might as well be honest--- it will take an act of God for me to get tomorrow's REVEAL post up at a timely hour... Please don't hate me!! I am a single mama all morning, then we have the moving truck and friends coming to help all afternoon, then my dear sis-in0-law flies into town for the shortest little visit, so we'll be spending much of the evening with her... and .... yeah. You see the challenge. I WILL post, though. Somehow.
Okay. On to the FLOWERS!
HANDMADE FLOWERS
These have been incredibly fun to make... to look at the finished product and feel like I have a little of the spirit of Anthro in me... a little vintage mojo... and a LOT of femininity. LOVE these things!
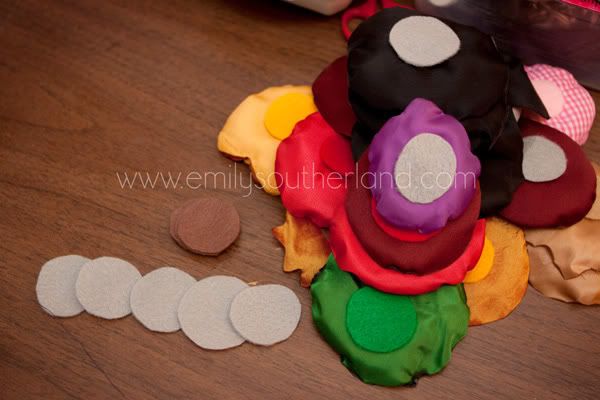
Love them so much, I kinda couldn't stop making them:
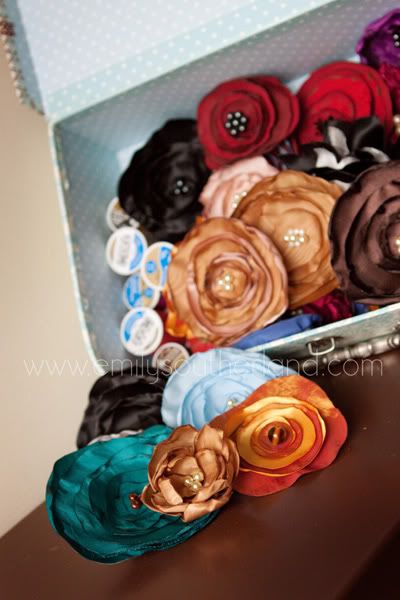
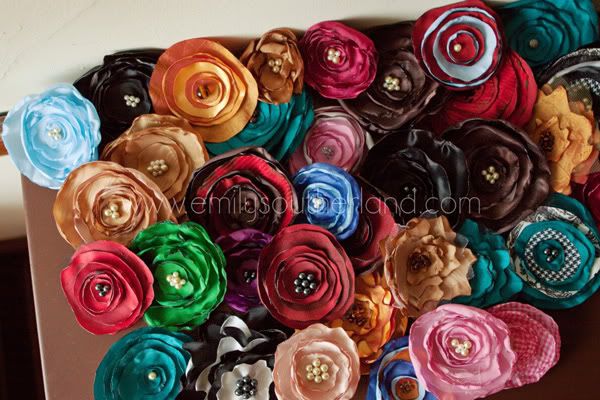
Yeah. Seriously. That's CRAZY.
But CRAZY EASY, too. In fact, all you NON-sewing machinists out there, this is for YOU. I did 97% of these by hand.
Okay, first, the inspiration. I was inspired by the gorgeous headbands I'd been finding at Anthro, Target, Claire's Boutiques, and For Love 21... And I KNEW there had to be a way to make my own flowers. So I started searching Etsy for inspiration. And found Monkey and Squirrel, and her gorgeous stretchy headbands. (Like THIS and THIS). Reading her description, she talked about "hand singed" fabric, and I was intrigued. SINGED? Like BURNED? Of course, she didn't reveal her tricks, since she's a saleswoman, so I had to go visit my friend Google. (I am a GOOGLE PRO, by the way. So good at Googling. If you ever need me to Google for you, I will HAPPILY do it. I am the best.)
My Google quest led me to so many good, inspiring sites, like:
EcoKaren: Fabric Flower Tutorial
La-Sha: Fabric Flowers: Here's How!
MaximumRabbit Designs: I've Been Crafting!
It seemed easy enough, and I was ready to give it a try.
Materials:
Synthetic fabrics like organza, taffeta, satin, dress lining, tulle, etc. (these burn the best...)
Matching thread
Beads/pearls/buttons/other (for the centers)
Felt (again, I WISH WISH WISH I had that GOOD felt, from here, but I had to use the cheapy Walmart felt)
Alligator Clips
Step One: Select and cut your fabric
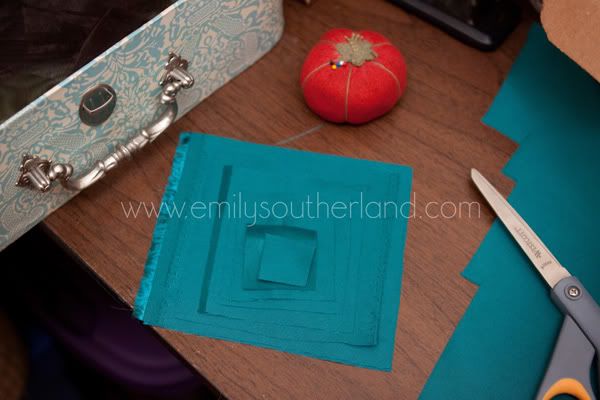
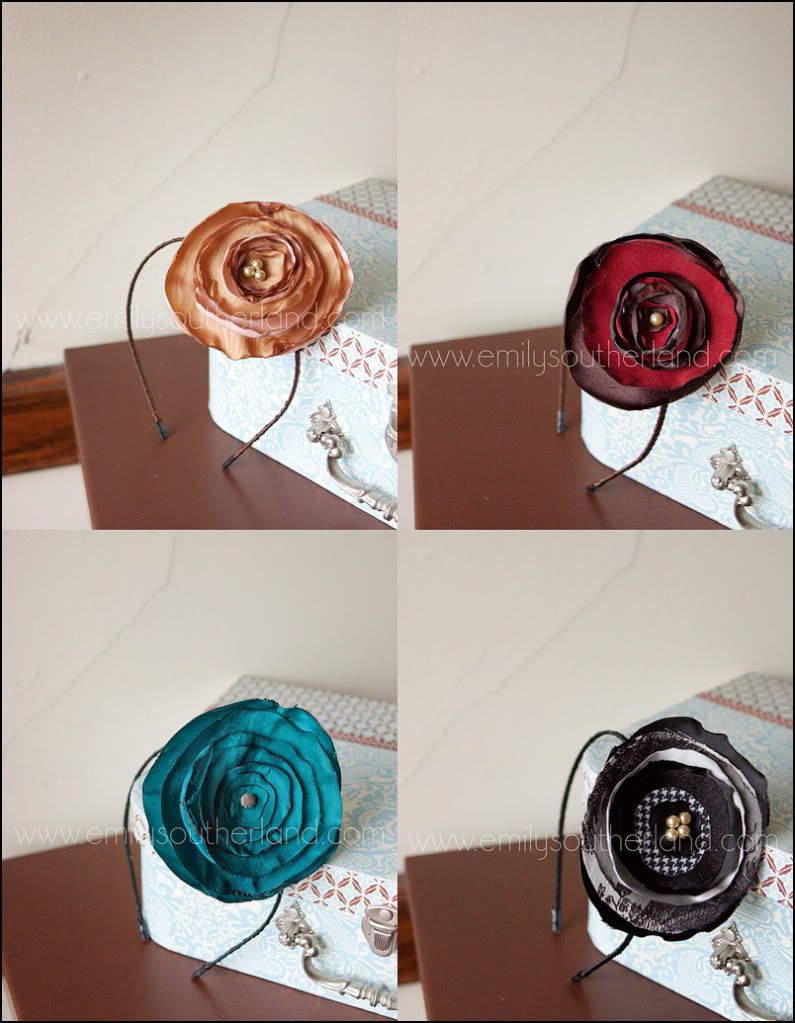
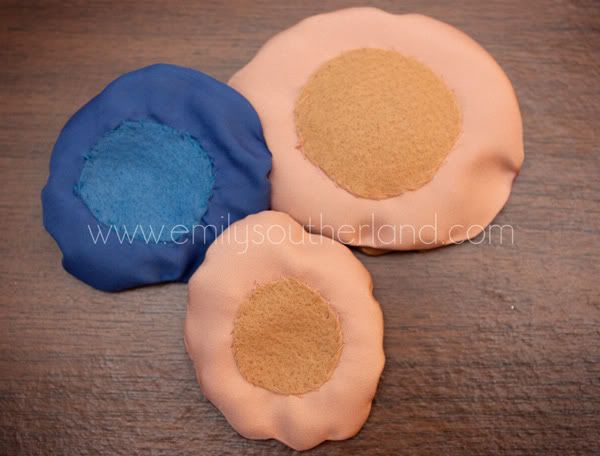
I had SO much fun selecting fabric. Many of my flowers are monochromatic, only one color... but you can stack colors, patterns, fabric types, WHATEVER.... To get all kinds of looks. In the photo above, I'm going with a basic single-fabric flower.
I'm starting with squares here, which I will then "free hand" cut into circles. You can be more precise than this, if you want, drawing circle patterns then cutting around them. I tried it both ways, and this went faster for me. The key is to get lots of layers in descending sizes. The more layers, the more bulk to your flower.
Step Two: Singe the fabric
I am so sorry I don't have an image of this... but it really hard to wield burning fabric and a big camera at the same time! DANGEROUS!
But here is a list of things to help you get this done:
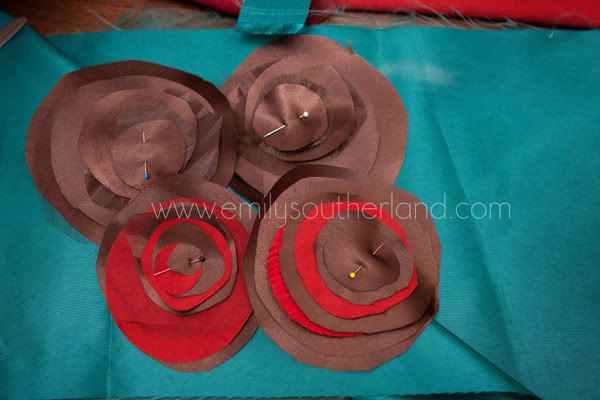
Step Three: Once all your circles have been singed to your satisfaction, stack them and stitch a few hand stitches through the center to hold them together. These can be small little stitches.
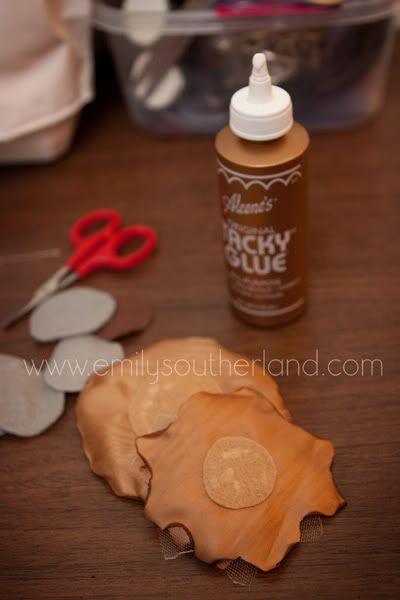
Step Four: Choose a button, some beads, or any other idea for your center, and hand stitch or glue them to the center. If you are using glue, I recommend TACKY GLUE. LOVE it for fabrics.
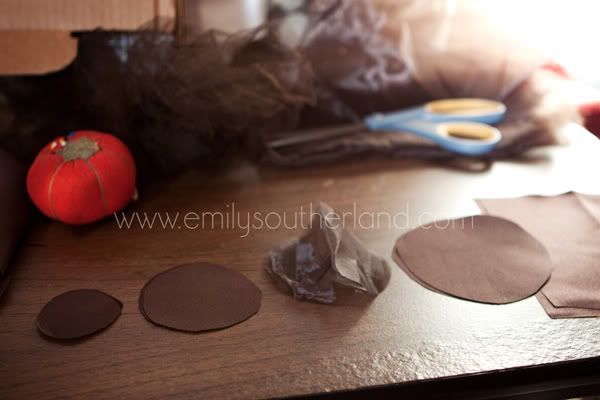
Step Five: Prepare felt circles for the back.
The purpose of these is to hide the stitching and give a good solid foundation for your flower. You can then sew/glue on pins, bobby pins, barrettes, or alligator clips. I tried to use matching felt, and cut a circle that fit the back without overwhelming it.
Step Six: Attaching the felt posed some issues for me. I first tried hand-stitching:
This was the most charming, but also TERRIBLY time-consuming. If I was only making one flower, I'd do it this way. But because I was making a gazillion, I needed some other alternatives.
So I tried Tacky Glue:
At the time, this seemed to not be very effective... But ones that stuff dried, it was WONDERFUL. And didn't show through like it did when it was wet. LOVED this stuff.
Step Seven: But then I was left with a new problem... How to attach the alligator clips? I also tried hand-sewing these on. It worked OKAY, but it was tedious and I worried that the thread would eventually give out after too much wear and tear. So I then came up with this little idea:

Here is where that 3% of sewing machine time came in... I stitched on another piece of felt, THEN glued on the whole thing. The idea was that the clip/bobby pin could go through the felt pocket. It would be only a SEMI-permanent clip this way, and could be lost since it wasn't attached, but it definitely worked for clipping the flowers to the headbands or to a shirt lapel, etc.
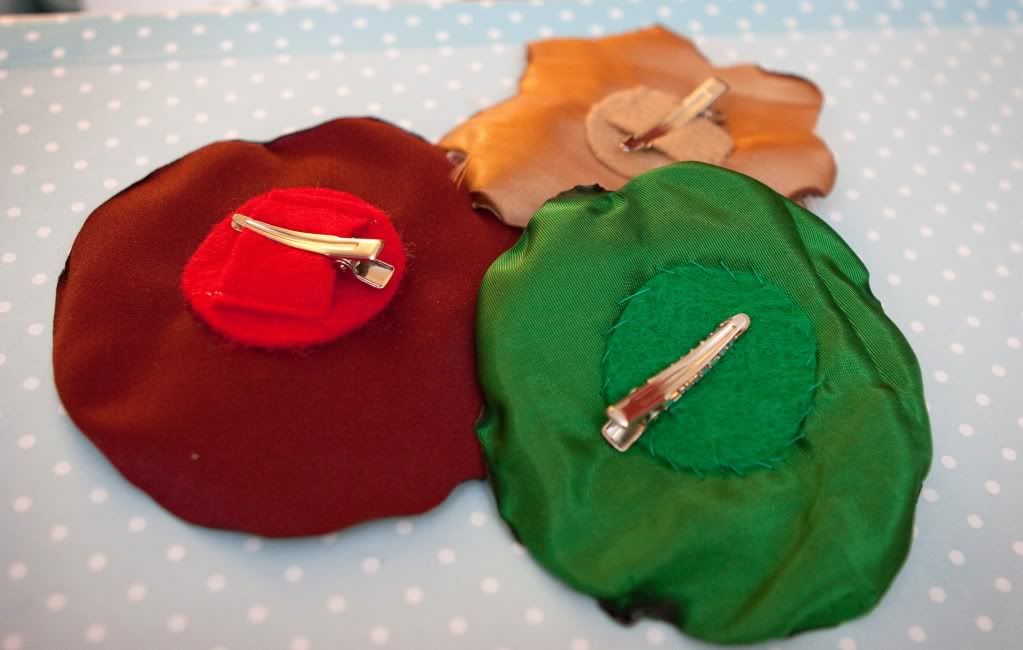
(the green one is stitched on, the other two use the new system.)
*
And there ya have it. Handmade flowers. I bought some thin metal headbands on Ebay and covered them with ribbon, but these flowers can clip onto any covered headband you buy at Walmart/etc. Or you could use them on clothing. Or as a gift topper. You can clip them directly into your hair. Or sew them onto stretchy headbands like that one Etsy seller.
The key here is in the fabrics and the combos you choose... Because they are ridiculously easy to make, but your personality shines when you make it your own with color and texture and contrast.
So... go forth. release your inner Pyro. It's all in the name of gorgeous party-fabric flowers. You'll be so glad you did!
(And you non-machine girls can do this TOMORROW if you have the will. No bulky machine needed if you hand sew all the parts!)
Okay. Past midnight. GAA! Gotta go. bedtime.
Happy crafting!
Still... It has been INCREDIBLY fun to do this. And quite honestly, if there was any week I could use the influx of comments and blog love I've gotten with this contest, THIS would be the week. Being so spread thin... being so weary... it has been incredibly uplifting and re-energizing to hear from all of you. To even hear from longtime lurkers. I love lurkers! I'm a lurker myself on several blogs. :P
So... Anyway. Thanks for putting up with me.... being a bit late with this post. I might as well be honest--- it will take an act of God for me to get tomorrow's REVEAL post up at a timely hour... Please don't hate me!! I am a single mama all morning, then we have the moving truck and friends coming to help all afternoon, then my dear sis-in0-law flies into town for the shortest little visit, so we'll be spending much of the evening with her... and .... yeah. You see the challenge. I WILL post, though. Somehow.
Okay. On to the FLOWERS!
HANDMADE FLOWERS
These have been incredibly fun to make... to look at the finished product and feel like I have a little of the spirit of Anthro in me... a little vintage mojo... and a LOT of femininity. LOVE these things!
Love them so much, I kinda couldn't stop making them:
Yeah. Seriously. That's CRAZY.
But CRAZY EASY, too. In fact, all you NON-sewing machinists out there, this is for YOU. I did 97% of these by hand.
Okay, first, the inspiration. I was inspired by the gorgeous headbands I'd been finding at Anthro, Target, Claire's Boutiques, and For Love 21... And I KNEW there had to be a way to make my own flowers. So I started searching Etsy for inspiration. And found Monkey and Squirrel, and her gorgeous stretchy headbands. (Like THIS and THIS). Reading her description, she talked about "hand singed" fabric, and I was intrigued. SINGED? Like BURNED? Of course, she didn't reveal her tricks, since she's a saleswoman, so I had to go visit my friend Google. (I am a GOOGLE PRO, by the way. So good at Googling. If you ever need me to Google for you, I will HAPPILY do it. I am the best.)
My Google quest led me to so many good, inspiring sites, like:
EcoKaren: Fabric Flower Tutorial
La-Sha: Fabric Flowers: Here's How!
MaximumRabbit Designs: I've Been Crafting!
It seemed easy enough, and I was ready to give it a try.
Materials:
Synthetic fabrics like organza, taffeta, satin, dress lining, tulle, etc. (these burn the best...)
Matching thread
Beads/pearls/buttons/other (for the centers)
Felt (again, I WISH WISH WISH I had that GOOD felt, from here, but I had to use the cheapy Walmart felt)
Alligator Clips
Step One: Select and cut your fabric
I had SO much fun selecting fabric. Many of my flowers are monochromatic, only one color... but you can stack colors, patterns, fabric types, WHATEVER.... To get all kinds of looks. In the photo above, I'm going with a basic single-fabric flower.
I'm starting with squares here, which I will then "free hand" cut into circles. You can be more precise than this, if you want, drawing circle patterns then cutting around them. I tried it both ways, and this went faster for me. The key is to get lots of layers in descending sizes. The more layers, the more bulk to your flower.
Step Two: Singe the fabric
I am so sorry I don't have an image of this... but it really hard to wield burning fabric and a big camera at the same time! DANGEROUS!
But here is a list of things to help you get this done:
* Get a candle where you have access to the flame (not a jar candle, for example).
* Get a small dish of water.
(This is your safety water. You can dunk a flaming piece of fabric in here if it gets out of hand. I never had to use my water, but I would never NOT have some nearby.)
* Do not sew your pieces together first. You want to singe each individual circle first.
* Begin with one circle, and hold it at one edge. Start lowering the far edge towards the flames.
* The key here is to go slow at first, until you get a feel for where the heart starts to do it's magic.
* Surprisingly, you do NOT have to be as close to the fire as you'd think. the wave of heat does the trick at quite a distance.
* practice on a spare circle first, if you want. Every fabric "singes" differently. Some curl up more, some melt a bit, some actually tend to flame up (I didn't need the water, but waving the piece rapidly to put out the little flame was effective). BE SO CAREFUL!!!
* DON'T do this part of the craft in front of your kids. They'll think it is okay to do this sort of thing. When it really ISN'T the best thing. All you closet Pyros, rejoice!
Step Three: Once all your circles have been singed to your satisfaction, stack them and stitch a few hand stitches through the center to hold them together. These can be small little stitches.
Step Four: Choose a button, some beads, or any other idea for your center, and hand stitch or glue them to the center. If you are using glue, I recommend TACKY GLUE. LOVE it for fabrics.
Step Five: Prepare felt circles for the back.
The purpose of these is to hide the stitching and give a good solid foundation for your flower. You can then sew/glue on pins, bobby pins, barrettes, or alligator clips. I tried to use matching felt, and cut a circle that fit the back without overwhelming it.
Step Six: Attaching the felt posed some issues for me. I first tried hand-stitching:
This was the most charming, but also TERRIBLY time-consuming. If I was only making one flower, I'd do it this way. But because I was making a gazillion, I needed some other alternatives.
So I tried Tacky Glue:
At the time, this seemed to not be very effective... But ones that stuff dried, it was WONDERFUL. And didn't show through like it did when it was wet. LOVED this stuff.
Step Seven: But then I was left with a new problem... How to attach the alligator clips? I also tried hand-sewing these on. It worked OKAY, but it was tedious and I worried that the thread would eventually give out after too much wear and tear. So I then came up with this little idea:
Here is where that 3% of sewing machine time came in... I stitched on another piece of felt, THEN glued on the whole thing. The idea was that the clip/bobby pin could go through the felt pocket. It would be only a SEMI-permanent clip this way, and could be lost since it wasn't attached, but it definitely worked for clipping the flowers to the headbands or to a shirt lapel, etc.
(the green one is stitched on, the other two use the new system.)
*
And there ya have it. Handmade flowers. I bought some thin metal headbands on Ebay and covered them with ribbon, but these flowers can clip onto any covered headband you buy at Walmart/etc. Or you could use them on clothing. Or as a gift topper. You can clip them directly into your hair. Or sew them onto stretchy headbands like that one Etsy seller.
The key here is in the fabrics and the combos you choose... Because they are ridiculously easy to make, but your personality shines when you make it your own with color and texture and contrast.
So... go forth. release your inner Pyro. It's all in the name of gorgeous party-fabric flowers. You'll be so glad you did!
(And you non-machine girls can do this TOMORROW if you have the will. No bulky machine needed if you hand sew all the parts!)
Okay. Past midnight. GAA! Gotta go. bedtime.
Happy crafting!
EMILY!!! You have just save me SO much time!! I was on my own quest to see how you made these for the swap. I want to make a few for Alex! A BIG MWAH! from me!!!
ReplyDeleteAdorable. You so need a girl in your little family for all your girly creations! :)
ReplyDeleteYay! I can see myself doing this. I was a total pyro as a tween. Hooray for not needing a sewing machine! Thanks for taking the time to do these tutorials.
ReplyDeleteI'm stoked to make these. In fact...I can' sleep, so I think I'll give them a try right now!
ReplyDeletei'm so excited about these! i love flower headbands and will be making a whole bunch.
ReplyDeletethat is really awesome!
ReplyDeleteVery cool Em!! Not sure I would be coordinated enough to do this! But, I love seeing how you do stuff :)
ReplyDeleteVery cool Em!! Not sure I would be coordinated enough to do this! But, I love seeing how you do stuff :)
ReplyDeleteimpressive.... this one intimidates me a little. but I will try.
ReplyDeleteHoly geeze. I'm so glad you did this for the swap because I love having them but there is no way in heck I could have made one. I'm soooo amazed that you made 26 of these! On top of everything else going on. Wowza.
ReplyDeleteReally adorable! You did a great job explaining how to make all the projects this week. Your blog is such an inspiration.
ReplyDeleteI am definitely going to make some of these. I may try itty bitty ones for Finley.
ReplyDeleteI can not BELIEVE how many of these you made! They ARE super easy, but I found them to be pretty time-consuming when I was making a few for my sale. Of course yours are more professional looking. :) You are amazing! So cute!
ReplyDeleteHmmmmmmmmmm...methinks that you have much more energy than I! I am so impressed with your creative talent and your limitless creative energy. These are gorgeous...they will be filed away in my "I intend to do this sometime as a fab gift for someone" file in my mind. So, so cute and personalized.
ReplyDeleteGood luck with the move. I'm glad that comments have helped you through this. I am sure that it is not a FUN time, but once it's over, what wonderful chi you'll have in your new place. And onto bigger and better things!
so cute! I wish my girls were "girly" and would wear one on a headband or hat!
ReplyDeleteEm, these are gorgeous, and so you!Thanks for taking the time to learn how to make them, and for sharing with us! This might be a summer project Anna and I can do together! She would love to have some of her own. They are absolutely BEAUTIFUL!!
ReplyDeleteOh now this is perfect!
ReplyDeleteWow Emily, You are one dangerous gal! Its such a fun idea one day I may just try it!
ReplyDeleteGood luck with the move!
They are beautiful! Awesome!
ReplyDeleteAs the proud owner of the headband featured in the bottom right corner of the 4 panel picture, I LOVE THESE.
ReplyDeleteEm, I made a car wallet last night and blogged about it. :) Paint pen was my last minute idea to put lines on the road!
http://thecarsonsblog.blogspot.com/2009/12/get-your-craft-on.html
love them! And you were right, super easy! I cant wait to try some myself!
ReplyDeleteLove them more than anything, I will be making about 200 sometime soon!!!!! Cannot gush enough about them......Happy moving truck day :)
ReplyDeleteThanks so much for this tutorial! I am LOVING the ones you made me and I can't wait to make some smaller ones for Eliana!
ReplyDeletegreat tutorial Emily - thanks for the link to my blog :0)
ReplyDeleteAleene's. GENIUS!!!
ReplyDeleteI need some of these! I have decided to hijack my mom's mini sewing machine and my sister is going to help me with some of these projects! I can't wait!
ReplyDeleteThose are so adorable! Went to a shower today and one of the girls had one similar to it...
ReplyDeleteAnd I'm feeling reassured about earlier projects AND this thanks to you...
PS - why aren't we Facebook friends? Am I really that lazy to not "add" you??
these are perfect! I wish i had seen them last night, i turned in just before you posted this i guess. i made my sister on a mish one headband using one of heather bailey's templates but wanted to do another one. sent that package off today but maybe i'll send her a new years one with these flowers. so so fun. i wish had half your creativity and ingenuity!
ReplyDeleteSo cute! I have a friend that this would be perfect for, I might have to give it a try.
ReplyDeleteI'm in love with you! hee/hee
ReplyDeleteFriday I went through my fabric box and I have a ton of jewel toned taffetta and other "party" dress type fabrics that my older daughter refuses to work with because it's too difficult. The fabric was given to us, but I couldn't just toss it, you know. So I refolded it and put it back in the box, thinking, someday, I will do something with this stuff. Now, I have something! MY younger daughter likes to wear flowers in her hair. Thanks so much!
These are so fun and flirty and I have everything on hand. I can't wait to make them.
ReplyDeleteThose are so awesome, thanks for the tutorial!
ReplyDeleteLOVE these!!!!!!!!! I am going to try to make them :)
ReplyDeleteLOVE these. I would try it but I know it would be a disaster!1
ReplyDeleteAs you already know, these are AMAZING! I have seen this idea, but nowhere have I seen such brilliant execution of style. Swoon! Now, where'd the alligator clips come from?
ReplyDeleteThese flowers are beautiful---I always scope them out when I'm shopping, but chicken out and never buy them. I think I'm going to have to make some, though, since they're SO adorable, so now I won't have an excuse to not wear them!!!
ReplyDeleteLove the flowers!!! Too cute!! ~Rachel
ReplyDeleteSoooo pretty! I love the picture of all of the flowers piled together. The colors, the patterns, the beady little details...and you get to play with fire too?? Awesome! Lyn(say)
ReplyDeleteI love little feminine touches like this - so cute!
ReplyDeletethese are cute, if only I had girls! But I think I may still try to make em!
ReplyDeleteSo pretty! I want to make some for Violet!
ReplyDeleteThanks for doing this. I can't wait to give it a try.
ReplyDeleteThese are VERY cool Emily, I can totally see how it could turn into an addiction!
ReplyDeleteLove, love, love them! And I just got hit with a bolt of inspiration. I could buy a bunch of fabrics and even pre-cut some circles (and pre-sew the attachment thingies) and then have a girls' night at my house with some friends. This is totally something that we could do together in an evening. Whoopee! THANK YOU! I will make sure we toast you at our gathering. :)
ReplyDeleteokay, I think this tied with the Celebrate banner for stealing my heart! I LOVE things like this! And since it doesn't require a sewing machine, I think I may actually make this one. I am thinking these would make a cool Christmas gift for my young women- THANK YOU!
ReplyDeleteAre you kidding me? So easy! I totally love this look and was having a hard time finding it for a small head. Problem solved, you rock my world, Ms. Emily.
ReplyDeleteI love that these are so easy that except for the singing, a child can do them. When my niece gets older, this is a craft we could do together... She will love making these, and I can even singe the material before she gets to my house. She will never know fire was involved!!
ReplyDeleteI have been wanting to make these for awhile! Thanks for the tutorial. Wow, I can't believe how many you made!
ReplyDeleteCute-a-rama!
ReplyDeleteThese are beautiful and now I'm wondering how many I can whip up for stocking stuffers for all my sisters!
ReplyDeleteThanks for saying you love lurkers. We love you too. ;)
These are beautiful! Wish I would've participated in the Christmas swap just to get one of these!
ReplyDeleteSweet flowers, maybe my niece and my sister would like to make these sometime!
ReplyDeleteThese are so cute! I wear lots of headbands and am always looking for something new to embellish with. Adding them to the list!
ReplyDeleteI'm sure it's not lost on you that these would make really cute head bands for a baby.
ReplyDeleteI am so jealous of your swap team. I know this is not a very Christmas-feeling but color me green with envy!
ReplyDeleteI am going to try this...I will send you a pic of the zipper flowers too since I forgot to bring it with me to the photo session.
ReplyDeleteI love the colors! You've been so quiet lately at ELW and now I know why! You've been a busy little elf!
ReplyDeletexoxo
i've already made a couple...LOVE these. thanks for the tutorial!
ReplyDeleteI love you!! You have seriously just made my day! I have been trying to figure out how to make some cool headbands for some teenage girls who are always helping me out with my boys at church and these are just what I wa imagining. Thank you, thank you, thank you for sharing how you make them. This is me (a tired Mom who should be going to bed, but alas am still up to my eyeballs in craft projects for christmas) who is now oh so happy by finding this tutoril. Smiles to you!!!!! Thank you. (and yes I am a lurker.) Good luck with all your moving stuff. So stressful. You are amazing for getting all these tutorials up and moving at the same time. A.M.A.Z.I.N.G.
ReplyDeleteoh i just stumbled across this! thanks so much for giving my headbands a shout out. yours look great too! aren't they so much fun to make? happy flower making!
ReplyDeleteEmily, I found you through your cousin Kristen's blog and she made these too! I absolutely adore them and have made some. Hope you don't mind if I share your blog with others and if I bookmark it. You are very talented and I love your photography.
ReplyDeleteYour flowers are fabulous and I can't wait to make some. Thank you so much, Emily!
ReplyDelete(I acme from Suzanne's site.)
Great creativity with very clear instructions. Keep up the good work!
ReplyDeleteThis is fantastic. Thank you so much.
ReplyDeleteJust found your tutorial, wahooooo, love these, thanks to Suzanne @ Just Another Hang Up for featuring your flower tuto. Now I know how to make these fun flowers.
ReplyDeleteThank you.
The picture with ALL your flowers makes me laugh. I do the exact same thing! Why make one when you can make TONS?? :) If you've got all the stuff out and you're rollin, why stop, right?
ReplyDeleteYour flowers are so cute!!
Emily, thanks so much for this tutorial. I sat down and made a but of petals yesterday and am now off to JoAnns for beads for the centers. LOVE them!!!!
ReplyDeleteHoly Smoke I have been on a hunt to make these fabulous flowers. I believe that was about 6 or 7 clicks backwards. I know I have fabric around here somewhere, better get looking. Did I say these flowers were fabulous? OMG, FABULOUS!
ReplyDeleteI just found this on pinterest and I am so so excited to do this!! Thank you for doing all the hard work of googling for us :)
ReplyDeleteLove it! thanks for sharing.
ReplyDeleteNice blog! I found the blog very interesting. Going through your blog i got to know about various craft projects for Christmas. From there i had an idea that there will be different craft projects for different occasions. Thanks for sharing…
ReplyDeleteThanks so much for the tutorial. I was inspired to make lots of different colored flowers and decided to sew them on a shirt (in retrospect, I should have chosen a black shirt made of thicker fabric, but...live and learn). Can I post a link to the photo? https://www.facebook.com/photo.php?fbid=10204472797042884&set=a.10202671096881506.1073741834.1320818690&type=3&theater
ReplyDeletethanks for not been selfish and share your pretty flowers, and how to do them, sorry for my English, I am Peruvian, and love crafts.
ReplyDeleteThanks for the great idea, did I miss what size to cut the circles?
ReplyDelete