
My sweet kiddo is still sick. It's getting better, but we are nowhere near WELL. *sigh*
Oh well... This is just the first of many bouts of sickness in my life as a mom, I suspect. So, when cabin fever threatens to take over, and the winter blahs are stealing away the creative juice, what does a girl with a camera do?
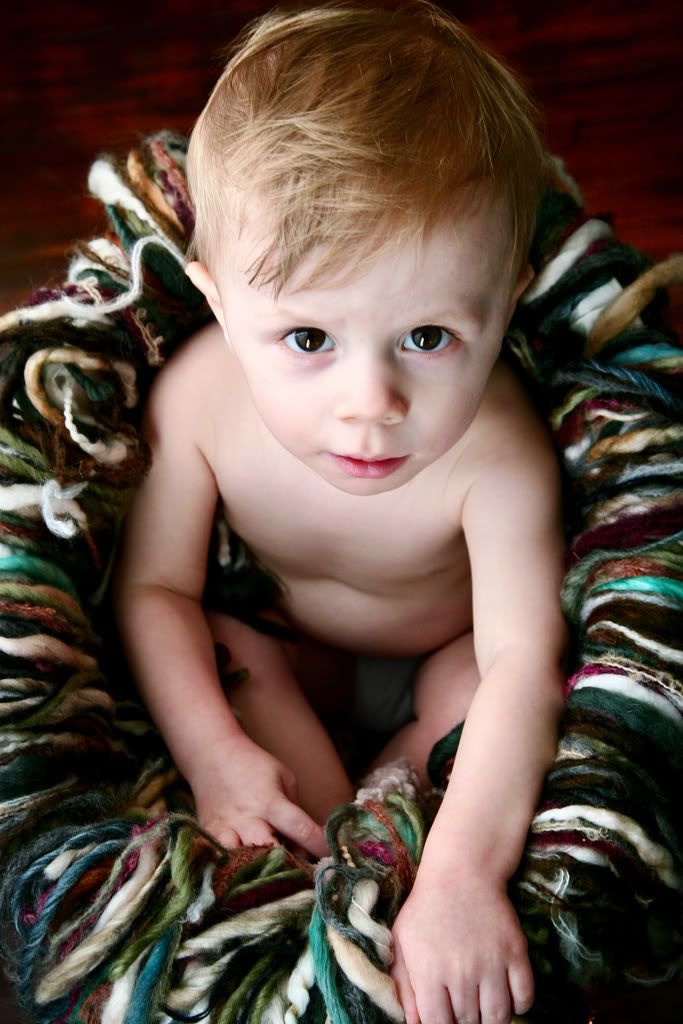
Why, stick her sick baby kid in a basket and make him pose for photos!

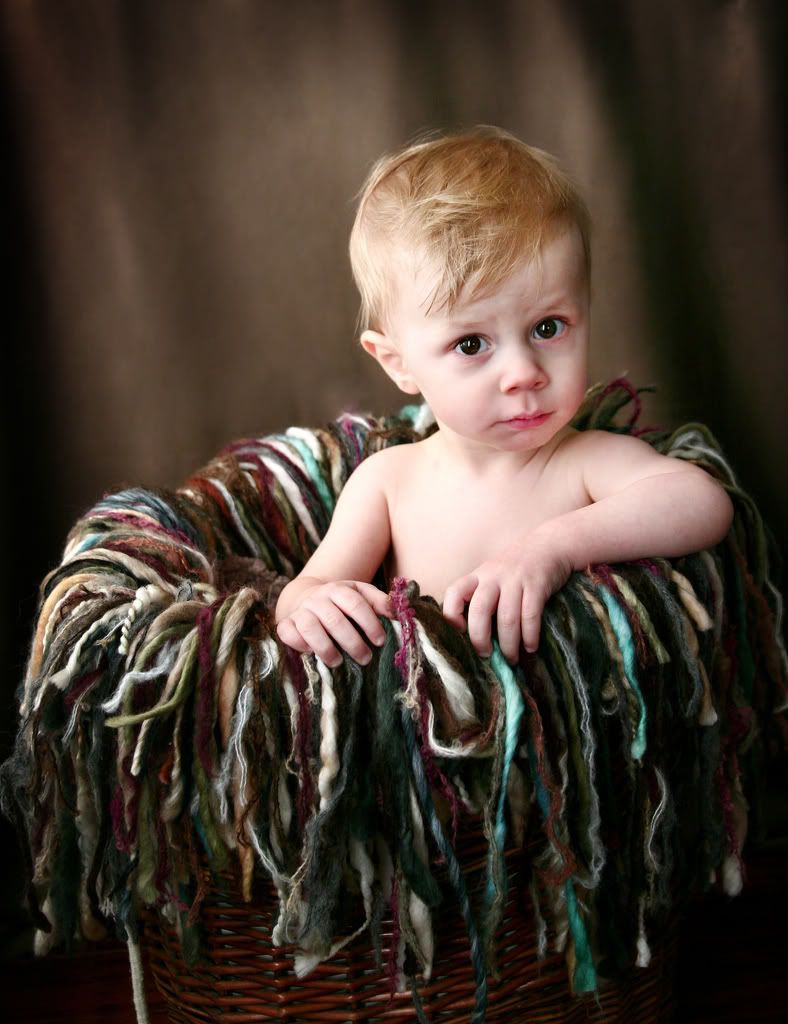
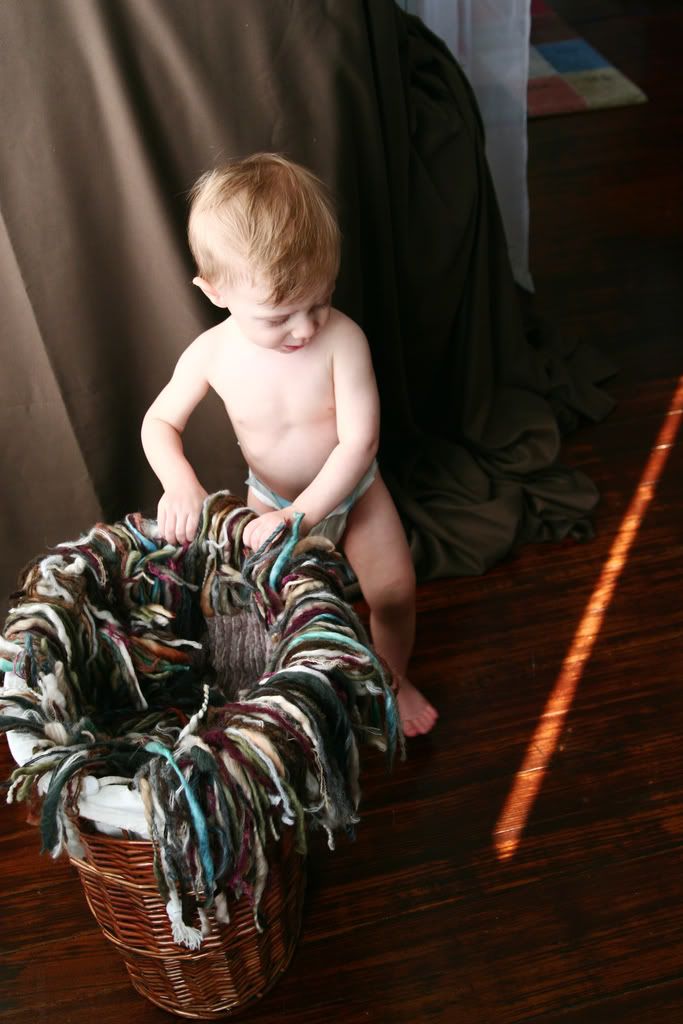
{Outtakes:}
don't you love how he is alternately miserable and FED UP with this whole process? That, or super fascinated by the yarn... Ha ha!

The inspiration for this shoot came from a heads-up thread on the TwoPeas Photography Message Board... Someone had spotted this gorgeous blanket on Flickr and said she needed it desperately. She said it could be found at TJMaxx, and that set everyone on the hunt... Suddenly, much like the Tickle Me Elmo type mentality, we ALL wanted one of these blankets! So funny! Well, lucky me, I finally found one at the fourth store I checked, and VOILA-- I now possess this silly, yarn-y throw blanket. And ya know? Though I bought into the craze, I am still very pleased with the results.
*
And since I have learned a million things about good photography from my TwoPeas associates, this post seemed a good time to "pay it forward" a little with some "How I Did It" info... So, let me show you my "set-up" for this quick, impromptu shoot with my little guy:
 And a few notes:
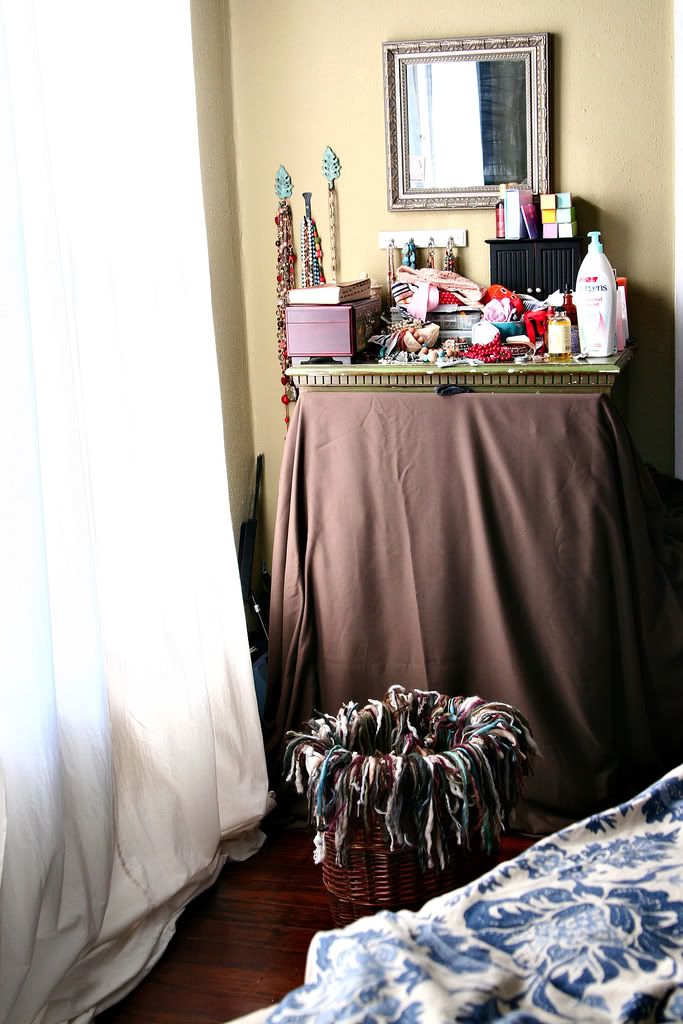
1. It is ALL about the light. Oh, MAN is it about finding pretty light. And the prettiest light I have found indoors is in my very own bedroom, at about two to three hours before the sun sets. In this case, my windows face west, and the photos were at about 3:30 pm.
2. BUT--- this light would NOT be so pretty if it weren't for my white muslin curtains. Too much of that western sun pouring in would take away that soft, diffused light you see in the photos above.
3. So. GREAT light + nice big windows + good diffusing curtains (NOT blinds-- too many "stripes"!) = an amazing photo setting
4. Okay. See the backdrop? This is a piece of heavy rayon that I draped/tucked into the top drawer of my dresser to take away the distractions of the background. In a perfect world, I'd have this hanging from my background stands, so there'd be no folds or wrinkles... But like I said-- this was totally fly-by-night, impromptu, so I made do.
5. The hardwood floor is lovely... So I kept it in. But you could also bring the fabric all the way across the floor, or if your carpet is neutral and not covered in broken Cheerios, you could leave it as is.
6. See how I shot so the light came from the side? This is mostly due to necessity. You can see my bed (the blue and white duvet), and you can see there just isn't much room to shoot. So I set it up where I'd have the most room to maneuver, since I use my 50 mm lens indoors and the 50 mm needs a LOT of space to get all of the photo in it. In hindsight, the side-lighting is LOVELY, and has the tendency to create drama and mood in photos.
7. I have also shot head-on in this area (see old samples, below). When you shoot head on, or so the light is directly behind you, if creates a more even light, which is also a wonderful result, but often has less "mood" and more "studio" effect. Also, if the light is directly behind you, make sure you aren't casting a shadow on your subject!
8. When the light is gorgeous like this light, the post-processing can be kept to a minimum. Truly, all I did to the first three photos was sharpen and defog using the Unsharp Mask Filter... and then I spent a bit of time on that pesky, fold-y, wrinkly backdrop fabric. I was bugged by the huge crease in it right behind Noah's head... In a perfect world, I'd have set this up better in the beginning so the crease was nowhere to be seen... But alas... Hindsight is 20/20. So I used the healing brush like mad, and I am glad now that it is not very distracting anymore. In fact, I bet if I hadn't even mentioned it, you might never have gone back to those shots and looked to see my "cleanup job". Ha!
9. I think that is all my info for my setup-- oh, except, let me give you my settings: My camera was set at ISO 400, and the shutter speed fluctuated between 1/100th and 1/160th of a second. The aperture fluctuated between 3.5 and 4.0.
10. Lastly, to show you how I have used the HECK out of this silly little corner of my apartment, here are some of my Noah photos over the last year. I'll add some info at the end to detail each one. But if there are any questions left over or ANYTHING, please feel free to leave a comment and I'll try to answer it with a comment of my own.
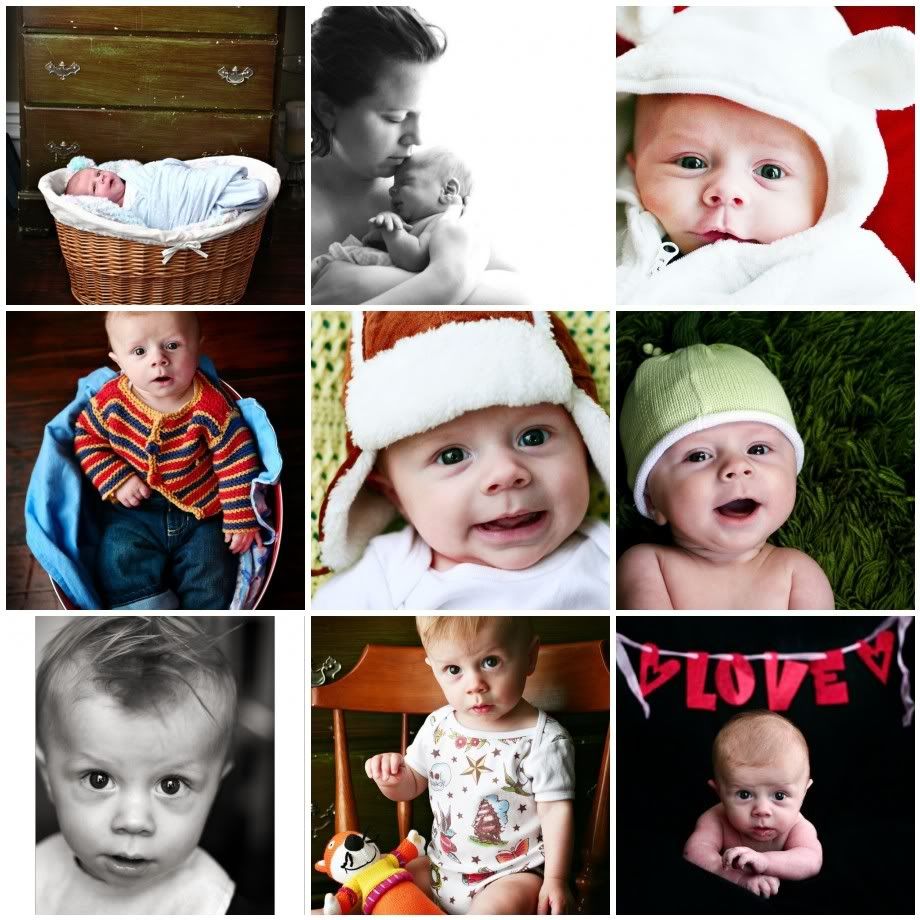 1. Swaddled in Basket: see the dresser? No backdrop here. And it works. Morning light.
2. Noah and Me: Self-timed portrait using the window with the curtain as backlighting. I exposed for my face so the background would be blown out and I would get proper exposure. Afternoon light.
3. Polar Bear: He is on our bed, and the windows are behind me to my right. Morning light.
4. Stripes in a Bucket: this is in the EXACT same position as the yarn photos above. Midday light.
5. Fur Hat: the yellow blanket is tucked into the dresser and Noah is propped in his boppy so he is upright. Nearly the same angle as the above yarn photos. Morning light?
6. PeaPod Kid: This is on the floor beneath the windows. I put my shag rug down, then Noah, then stood on a chair above him to get the shot. Windows to my right. Midday light.
7. Black & White: this was a candid. Noah was playing on the side of the bed and I got right next to the windows, to my back, and lucked out with this shot. The f-stop was low enough that the messy background was totally blurred, and therefore NOT a distraction. Afternoon light.
8. Chair & Onesie: Same exact spot at the yarn basket shot. See the dresser? Afternoon light.
9. LOVE: this is the sample of straight-on light. The windows are behind me, and Noah is set up on our bed with a black backdrop. See how it looks more "studio" because the light is flat, and not so nuanced? He's propped on a boppy under the black fabric. Morning light.
Okee-dokee... That is it for tonight, all!
Hope SOMEONE got something out of this! I know I am ALWAYS fascinated by the "behind the scenes" stuff photographers show me... so interesting, and so enlightening.
Okay... off I go. There is much to be done before I can go to bed. And maybe Noah will make it a whole night without fluid coming out either end of his poor, torn-up body. *sniff*
*
And since I have learned a million things about good photography from my TwoPeas associates, this post seemed a good time to "pay it forward" a little with some "How I Did It" info... So, let me show you my "set-up" for this quick, impromptu shoot with my little guy:
And a few notes:1. It is ALL about the light. Oh, MAN is it about finding pretty light. And the prettiest light I have found indoors is in my very own bedroom, at about two to three hours before the sun sets. In this case, my windows face west, and the photos were at about 3:30 pm.
2. BUT--- this light would NOT be so pretty if it weren't for my white muslin curtains. Too much of that western sun pouring in would take away that soft, diffused light you see in the photos above.
3. So. GREAT light + nice big windows + good diffusing curtains (NOT blinds-- too many "stripes"!) = an amazing photo setting
4. Okay. See the backdrop? This is a piece of heavy rayon that I draped/tucked into the top drawer of my dresser to take away the distractions of the background. In a perfect world, I'd have this hanging from my background stands, so there'd be no folds or wrinkles... But like I said-- this was totally fly-by-night, impromptu, so I made do.
5. The hardwood floor is lovely... So I kept it in. But you could also bring the fabric all the way across the floor, or if your carpet is neutral and not covered in broken Cheerios, you could leave it as is.
6. See how I shot so the light came from the side? This is mostly due to necessity. You can see my bed (the blue and white duvet), and you can see there just isn't much room to shoot. So I set it up where I'd have the most room to maneuver, since I use my 50 mm lens indoors and the 50 mm needs a LOT of space to get all of the photo in it. In hindsight, the side-lighting is LOVELY, and has the tendency to create drama and mood in photos.
7. I have also shot head-on in this area (see old samples, below). When you shoot head on, or so the light is directly behind you, if creates a more even light, which is also a wonderful result, but often has less "mood" and more "studio" effect. Also, if the light is directly behind you, make sure you aren't casting a shadow on your subject!
8. When the light is gorgeous like this light, the post-processing can be kept to a minimum. Truly, all I did to the first three photos was sharpen and defog using the Unsharp Mask Filter... and then I spent a bit of time on that pesky, fold-y, wrinkly backdrop fabric. I was bugged by the huge crease in it right behind Noah's head... In a perfect world, I'd have set this up better in the beginning so the crease was nowhere to be seen... But alas... Hindsight is 20/20. So I used the healing brush like mad, and I am glad now that it is not very distracting anymore. In fact, I bet if I hadn't even mentioned it, you might never have gone back to those shots and looked to see my "cleanup job". Ha!
9. I think that is all my info for my setup-- oh, except, let me give you my settings: My camera was set at ISO 400, and the shutter speed fluctuated between 1/100th and 1/160th of a second. The aperture fluctuated between 3.5 and 4.0.
10. Lastly, to show you how I have used the HECK out of this silly little corner of my apartment, here are some of my Noah photos over the last year. I'll add some info at the end to detail each one. But if there are any questions left over or ANYTHING, please feel free to leave a comment and I'll try to answer it with a comment of my own.
1. Swaddled in Basket: see the dresser? No backdrop here. And it works. Morning light.2. Noah and Me: Self-timed portrait using the window with the curtain as backlighting. I exposed for my face so the background would be blown out and I would get proper exposure. Afternoon light.
3. Polar Bear: He is on our bed, and the windows are behind me to my right. Morning light.
4. Stripes in a Bucket: this is in the EXACT same position as the yarn photos above. Midday light.
5. Fur Hat: the yellow blanket is tucked into the dresser and Noah is propped in his boppy so he is upright. Nearly the same angle as the above yarn photos. Morning light?
6. PeaPod Kid: This is on the floor beneath the windows. I put my shag rug down, then Noah, then stood on a chair above him to get the shot. Windows to my right. Midday light.
7. Black & White: this was a candid. Noah was playing on the side of the bed and I got right next to the windows, to my back, and lucked out with this shot. The f-stop was low enough that the messy background was totally blurred, and therefore NOT a distraction. Afternoon light.
8. Chair & Onesie: Same exact spot at the yarn basket shot. See the dresser? Afternoon light.
9. LOVE: this is the sample of straight-on light. The windows are behind me, and Noah is set up on our bed with a black backdrop. See how it looks more "studio" because the light is flat, and not so nuanced? He's propped on a boppy under the black fabric. Morning light.
Okee-dokee... That is it for tonight, all!
Hope SOMEONE got something out of this! I know I am ALWAYS fascinated by the "behind the scenes" stuff photographers show me... so interesting, and so enlightening.
Okay... off I go. There is much to be done before I can go to bed. And maybe Noah will make it a whole night without fluid coming out either end of his poor, torn-up body. *sniff*
Yep, you were right. I ate it up!! And I do all the same things...but goodness that is some lovely light. That light I don't get here very often. Randomly: the top right corner of the outtakes made my lip tremble. Wanted to scoop him up! Also, did you catch in your other sample photos how the bottom right and left corners (b&w and V-day) showcase the same angle, the same expression, but a year(ish) apart? Wow! So much has changed, and yet so much is the same. Very cool.
ReplyDeleteThank you! I am committed to improving my photography this year, and this post gives me a great place to start.
ReplyDeleteLove the 3rd one. He is so super cute.
ReplyDeleteThanks so much for the tip about the curtain. That would be perfect for the great morning light I get in my living room. Now if I could only get Finley to sit still.
Loved the outtakes too.
Oh you have totally inspired me (which you do often).....I hope your little man gets better soon!! I feel your pain mama.
ReplyDeleteK, my favorite outtake is the top right hand corner. Holy crap, that's a great expression!
ReplyDeleteThe pictures are beautiful and the tips brilliant, as usual.
Thank you, ma'm.
Thank you thank you thank you!
ReplyDeleteyes yes...THANK YOU for posting this! i'm off to find MY "perfect little corner"! :)
ReplyDeleteThanks so much for this! Not only is Noah absolutely adorable (like I need to tell you, but it doesn't make us love to hear it any less, does it?), but I REALLY appreciate all the behind the scenes. I feel like I'm sneaking in on the trade secrets here- I'm learning all sorts of crazy stuff with my camera and I'm so so SO glad you posted this. I hope you do it again!
ReplyDeleteOk, the outakes...the top left one is a keeper! I absolutely LOVE pics of kids with that look. So often we just go to comfort them and it is nice to wait a sec once in a while and snap a photo. They seem to be a tad bit dramatic and distraught a lot when they are little, so those photos bring back a lot of memories later on.
ReplyDeleteI loved this. All those photos were great. Thank you for all your tips and constant help.
ReplyDeleteI hope he feels better starting now.
I am so glad you posted this instructional! Keep 'em coming... please please please!!!!!!!!!!
ReplyDelete-Becky
Hey, that was me who posted the thread in search of the fringe blanket. I'm so glad you got one. I finally did too, thanks to another pea. ;) Love your behind the scenes shots and outtakes. I haven't even used mine yet. I'll have to post mine on 2peas or my blog when I finally do. TFS!
ReplyDeleteThank you, Thank you!! I'm planning a v-day shoot, and this gave me some perfect insperation!
ReplyDeletethankyouthankyouthankyouthankyouthankyou.
ReplyDeleteI am new to 2peas and just saw this reading threw the fringe blanket thread...I got a ton out of this blog, thank you! :) Your little man is so handsome btw!
ReplyDelete