
Let's not talk about the fact that this awesome project I'm about to share was actually something we did as a group almost three years ago. (More?) Nor let us talk about the fact that even after I'd received all the quiet book pages from my friends, it took another year to actually stitch and assemble them into a usable book.
Nor let us even delve into the fact that this poor little blog has not been a "crafty" blog in eons.
M'kay?
Suffice it to say, I DID finally finish this book. And then because I always intended to photograph and blog it, I only let my kids play with it once in a blue moon, and it sat, awesome-but-unused, for two years, and that's absurd, and so here we are. I'm blogging this thing. And then I'm taking it to church tomorrow, so my kids can play the heck out of it.
And p.s. I am also still crafty/bake-y/sew-y on occasion. Just not as often as I'd like. And definitely not in a time frame where photographing and blogging it all is very easy. I miss that... But it is what it is.
Anyway.
THE PREMISE
Once upon a time, fourteen friends all agreed to make one Quiet Book page, 14 times. The same one. Duplicated. Then the 14 friends were given a timeline, say 2-3 months, to complete their 14 duplicate pages. Typically, Quiet Books are made with felt, and we specified that the backing should be muslin of uniform size. But beyond the uniform size and typical materials, there were no other strict rules--- so we could go crazy and do our own thing.
Most of us needed some inspiration to know where to start. Luckily, there are a billion Quiet Book ideas online. We had some blog links we used for inspiration (oh goodness, Pinterest was just beginning then. So we didn't have Pinterest resources like we all do now. Oh, the olden days.)
For any of you wanting some inspiration beyond this blog post, here are some links to some great Quiet Book ideas:
* Imagine Our Life (these have some AMAZING ones!)
* MouseHouse: (this one is stunning!)
And seriously--- Pinterest has endless links to ideas!
Meanwhile, the 14 friends came through with their commitment, and at the end of our deadline, we all had 14 different pages to put together as we wished, for our very own Quiet Books. Some of my friends followed one cover idea, using jump rings, etc. Since I had a lot of sewing experience, I decided I wanted to rig my own cover design into something really sturdy. I decided to give my book a denim cover, and on a whim, made a fleece title for the cover- "HUSH", a fun modern nod to the Quiet Book theme.
Without further ado, here it is-- this major project, contributed to by 13 other amazing crafty girls.

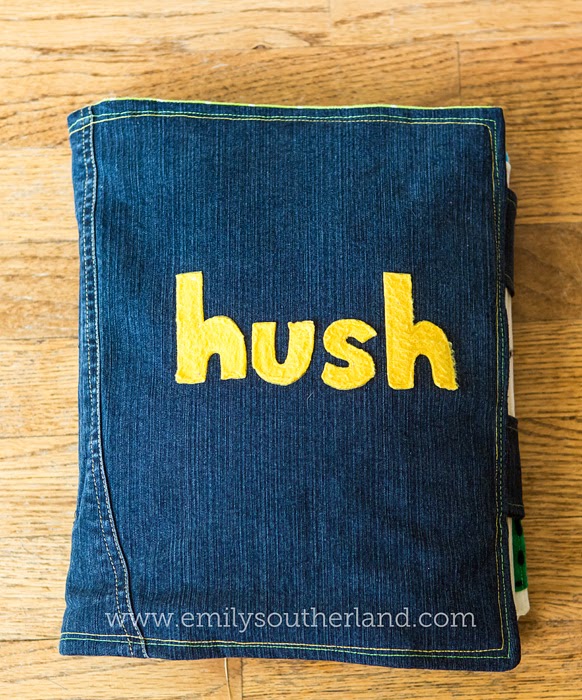
For the cover, I used a denim skirt that I found at Goodwill and upcycled it for a tidy and strong cover. I used two colors of contrast stitching to mimic the style of jeans, and after putting some iron-on interfacing onto the back of yellow fleece, I cut out the letters for the title and ironed it on before stitching it on.
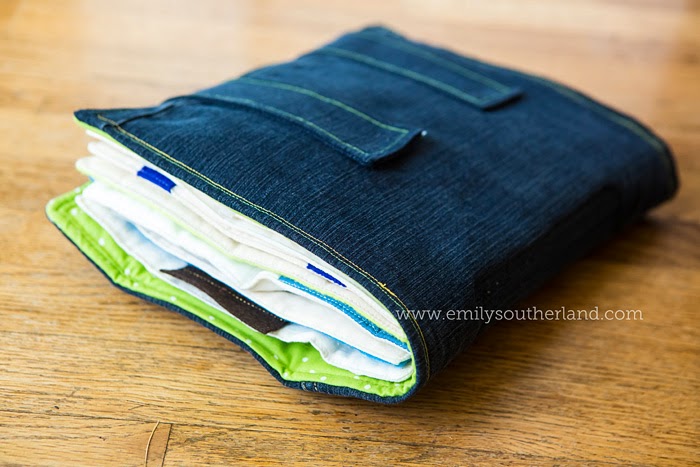
After adding some velcro and straps to wrap around the back, I then quilted the denim to some green polka-dot cotton with thin batting in the middle.

For fun, because I could, I added an inner pocket to both covers. I envisioned this being a place for some paper for drawing, maybe a pack of colored pencils... just handy to have pockets. You can never have enough pockets! I used a double-stitch again, for looks.

Since I worked my tail off on my own Quiet Book page, I decided it got to be the first page in my book. And since I love cupcakes, well..... I ended up brainstorming a QB idea of my very own, with the theme of cupcakes.

Confession: I hate felt.
So WHY would I ever have agreed to do a project that is primarily felt? I dunno. I need to get over my felt snobbery. But you know, since I LOVE sewing, and HATE felt, I decided to make my QB page my own way. 14 times. So My QB page is fleece, corduroy, and cotton. It took more effort than felt would've, but it was worth it to me. And I love the result. And guess what? NO PILLING WILL EVER HAPPEN. *happy sigh* (As for the rest of the beautiful pages, done in felt? Worth it. Even when they ultimately pill. They're still so cool and I have no regrets being a part of this project. And, well... every one of those 14 books will have one guaranteed pill-free page. So there.)

The premise of my felt-free cupcake page: decorate the cupcake with three different "frostings", each reversible with two different fabrics. They have a button hole in their center and can be "buttoned" onto the "cherry", a red button. The cupcake itself is tan fleece, and the cupcake wrapper is corduroy. The wrapper is actually a pocket you can tuck the frostings into. And my favorite part? The "sprinkle shaker". This is heavy-duty clear vinyl and red vinyl, sewn together with seed beads sandwiched in the center, then attached to grosgrain ribbon. It can be "shaken", but nothing actually comes out. It also can be tucked into the wrapper "pocket". And the final touch is just a "C" for cupcake... a nod to learning letters. Ta da! Now make that fourteen times.
*
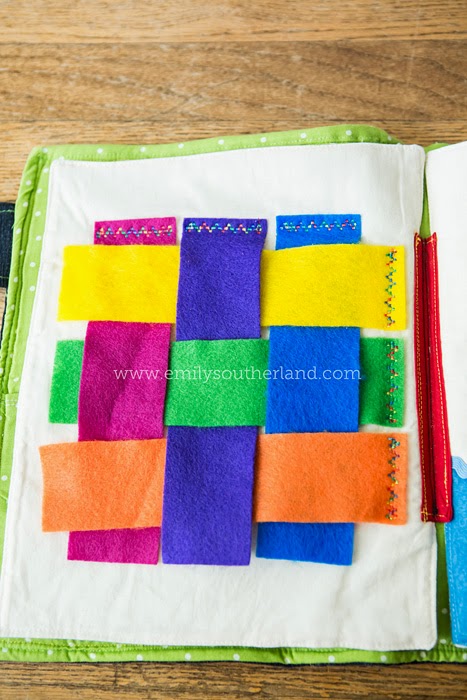
Page Two was made by my dear friend Sarah of Bombshell Bling. It's a fun and easy "basket weave" page, put together with some fun and fancy decorative machine-stitching.
Page Three, Noah's Ark by Tori. Tori was the brains behind this operation and got us all organized and kept us on task. She's amazing. And so is her page. This Noah's Ark is SO well-made--- and behind that door, check out the actual tiny plastic animals? This is darling.

Page Four is a vase of button flowers, a color-match page. I'm so sorry, Kadee and Amy-- I know you guys worked together, so I cannot remember which ones belong to who!
*
Page Five, by Ms. Jessica, is a super-fun road in a neighborhood, with a perfect pocket containing a HotWheels car. Vroom!
*
Note: For my own purposes in assembling my book, I took two pages and faced them right-side in, then stacked a piece of white fleece on top of a wrong side and sewed them all together, leaving a space to turn them right-side-out. I then pressed the opening closed and top-stitched the now-single piece to give it a clean, finished look. This wasn't necessarily the group's plan, so I got really lucky that our muslin pieces had enough room for me to do this. Only one page had elements so close to the edge that I had to modify the page a little, and that was the second-to-last page, where I had to cover a title that was going to get cut off.

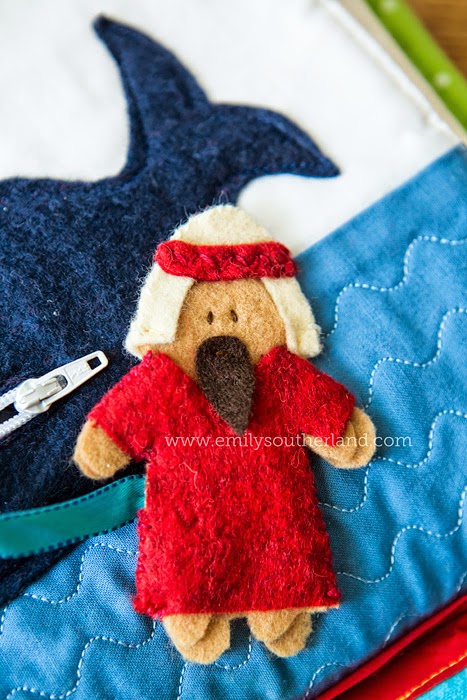
Page Six was crafted by Glori, and is a Jonah and the Whale masterpiece, using zipper skills.You all KNOW I love whales! This one is darling!

And a detail shot of the hand-stitched Jonah and the fun machine-stitched wave pattern. Yay, Glori for using some cotton among the felt! And Jonah, you're so cute.
Page Seven, by Natalie, who used some soft flannel to back her scene, and set up her barn atop that. Open the bard doors and you have.... FINGER PUPPETS!

A detail shot of those hand-stitched finger puppets. Don't ask me how I ended up with two pigs. I swear I had a third animal and not two pigs... but.... Hm. Anyone out there have two cows or something? Wanna trade?

Page 8-9 is another great page by either Amy or Kadee, or maybe by both of them working together? It features kites and snaps, a color-match activity.

A detail shot of the stitching--- I LOVE the clouds and the darling ties on the kitestrings.

Page 10 is by a friend of Tori's-- a master of Quiet Books, I might add. I don't know her name, because she contributed long-distance and we never actually met her, but I love both the pages she made for us. This is the first one, a mailbox with a postcard and a letter that can be tucked in.

The detail shot of the mail. Stamps and everything!

Page 11, another Amy/Kadee contribution, has hands-stitched shape outlines and snap-on colored shapes to match. Sorry again, girls, that I can't remember who did which one!

Page 12 is by my dear friend Michelle. She hand-hammered rivets for days to get her shoestring footballs completed. This page is designed to teach lacing and tying.
*
Page 13, the Tic Tac Toe page, is by Natalie, and features a ric-rac game grid and velcro-backed shapes for the game of tic-tac-toe. I added the polka-dot pocket afterwards so there was a good place to keep the shapes when not in use.

Page 14 is the second contribution from Tori's friend, the one I don't know. It might be my favorite of the whole book. I mean, check out this treasure chest! With an actual little gold padlock and key!

My favorite part of this whole project, honestly, is remembering each of the girls, my friends, who contributed. Most of them have moved away from St. Louis, wives of grad students/med students/etc. who have continued on their professional journeys... But this happened in a wonderful season of fellow-mom-friends all living in the same church congregation, a time in our lives I loved and miss... And this lovely book will always be special to me because it represents that era, and those friendships.
And now that it's finally been photographed, I'm going to let my kids love it til it's worn, and yes, pilled... That's what it was made for.
*

This is the cutest quiet book I have ever seen!!!! And I know you showed it too me when you were working on it. But, it was wonderful to look at it again. But, keeping three kids happy with ONE QUIET BOOK kind of defeats the purpose, ya know what I mean???? Good luck in church today
ReplyDeleteThat is fantastic. So great! I love that it is a collaboration of talent by so many people. I have thought about putting a quiet book together for years but just haven't been able to commit to that amount of creativity. But I would TOTALLY split it up with people. Thanks for sharing this. I'm going to organize a group of women would would be interested in making one with me.
ReplyDelete